Custom Views |
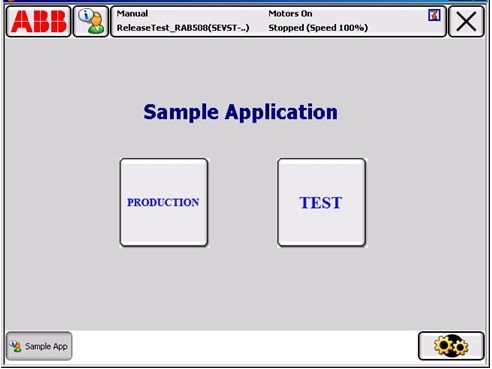
The Custom Views application demo provides two functions
Production
Test
The application has three views in it. The main view being the main screen which consists of Production and Test functions. The second view being the Production View and third view being the Test View.
If you encounter some build errors when this sample application is built, you need to add the DLL references. Refer How to build and execute in How to build and execute on FlexPendant tutorial. |
Main View

Responds to OperatingModeChanged and ExecutionStatusChanged events by disabling/enabling the Test button.
Internals
Memory management:
- Using Dispose where necessary to avoid memory leaks.
- Reusing the controller object: Letting the first view control the life time of the controller object and send it as an in parameter to the constructors of the other views.
Performance:
- How to use the Activate/Deactivate mechanism to enable/ disable subscription to controller events.
- To deactivate subscriptions when the application is not active on the task bar, and to read the values from the controller each time the view gets focus.
Stability:
- Exception handling.
Miscellaneous:
- How to use TpsResourceManager to fetch images. This is needed if you want an event to update an image of a button for example, as for the TEST button of the first view. (If you have static images that are to be used throughout the lifetime of the application (eg. the Production button in the first view), you probably embed the images by using the Properties Window in the VS Designer. (Then you don’t need to use the TpsResourceManager)
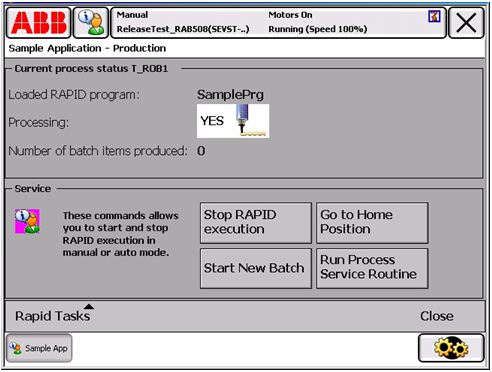
Production View

This function shows the current process status of T_ROB1, for example the loaded RAPID program in execution and the batches being processed. It also allows starting and stopping programs, service routines.
Internals
Databinding RAPID data:
- The RapidDataBindingource is connected to RAPID data 'cycles', and selected as a 'DataBindings' property by _lblCyclesValue control, which means that the label is updated each time the value of RAPID data 'cycles' changes.
Writing to RapidData:
- In the event handler _btnStartNewBatch_Click you can see how to create a RapidData object and write a new value to the corresponding RAPID data in the controller ('cycles' is reset to zero at start of new batch).
Set I/O signal:
- In the event handler _btnStop_Click you can see how to reset an I/O signal in the robot controller.
RapidDomain:
- You can see how to fetch RAPID program name and how to set and reset the program pointer and start and stop RAPID execution.
Miscellaneous:
- Coding GTPUMessageBox with callback method.
- Using a flag to ensure we do not set up multiple subscriptions to controller events or deactivate subscriptions that are already deactivated.
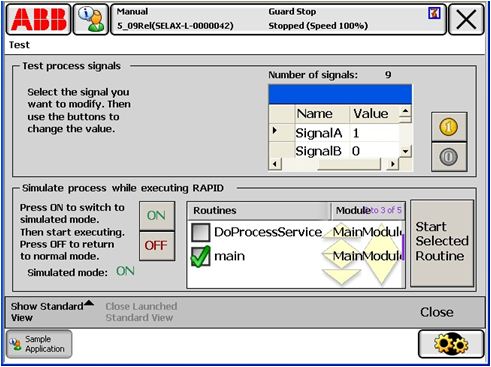
Test View
Another function provided by this view is the possibility to run the program or a specified routine in simulated mode (without any processing). The listview shows all routines in all modules of T_ROB1. The user selects a routine and starts it by pressing the 'Start Selected Routine' button.
The 'Show Standard View' menu on the command bar opens selected standard application. You can open the Program Data application for example and verify that 'simulated' is updated correctly.

If simulated mode is set in the Test view, there will be a “Simulated mode!” alert in the first view, and there will be no processing when the program is executed.
Internals
Databinding I/O signals:
How to use a SignalBindingSource and a DataGrid (good when there is a great number of signals). The DataGrid property DataSource connects to a SignalBindingSource, which in turn connects to 9 I/O signals in the robot controller. Using Databinding an easy way of displaying signal changes in the robot controller. By using the property 'signalBindingSource1.Current'it is possible to set a new value to the selected signal of the datagrid.
Read & Write RAPID data:
Read and write the persistent RAPID data 'simulated'.
Using the launch service:
Open and close a FlexPendant standard view from your application.
RAPID domain:
Fetch all modules and routines of a specified task and to set the program pointer to a specified routine and start RAPID execution.