Container style |
The container control of a FlexPendant application is 640x390 pixels, which is the exact size of the FlexPendant screen dedicated for a custom view. This section details the two different styles that can be used for a FlexPendant view: Empty and Form.
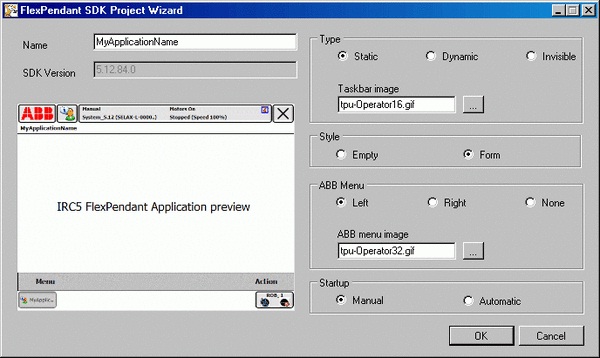
You select which one to use in the Style area of the FlexPendant SDK Project Wizard. To the left in the wizard, a preview helps you see the difference between the two styles.
Here Form is selected. The preview illustaration shows a TpsForm. It has a CommandBar at the bottom and a TpsCtrlTitleBar at the top.
When adding a new view to an existing FlexPendant project, you choose which control to use in the Add New Item dialog box. For more information on how to add a new view to an existing project, see Container Style. |
Your choice in the wizard determines the type that your view class will inherit. If you change your mind about this, it is easy to make the change directly in the auto generated code.
EmptyThis is a plain TpsControl . It has neither a, CommandBar nor a TpsCtrlTitleBar.
The code definition of the class will look like this:
Public Class TpsViewMyApp Inherits TpsControl Implements ITpsViewSetup, ITpsViewActivation
This is a TpsForm, which is a specialized TpsControl.
The code definition of the class will look like this:
Public Class TpsViewMyApp Inherits TpsForm Implements ITpsViewSetup, ITpsViewActivation
| Often Empty is chosen as the first view of a FlexPendant SDK application. For any secondary view, which is to be opened from the first one, Form is the recommended container control. |
| When selecting Form you might wonder why the command bar is not visible in the designer. The answer is that it remains invisible until a MenuItem has been added to it. This is done in the Properties window of the TpsForm, by applying the property MainMenu. |
| If you select the TitlePanel or the CommandBar of a TpsForm you will see that the Properties window is disabled. If you want to change the text of the title panel, or add menu items to the command bar, for example, you must select TpsForm by clicking somewhere in the middle and then modify its Text or MainMenu property. |
The command bar is either ready-made, as for TpsForm, or used as a separate control available from the toolbox. If the command bar is ready-made, the design of it is done by modifying the MainMenu property of TpsForm. If used as a separate control, you design it by modifying its own properties. Apart from this, there is no difference in how you control the design.
An important thing to remember is that you have to manually add the code controlling that will happen when you click a menu item, as there are no event properties available in its Properties window.
For more information on how to implement the control and its event handlers, see Command bar.
The command bar of the first view of a custom application should not have a Close button. The reason is that all custom application must be closed down by TAF, which happens when you click the close [ x ] button in the upper right corner of the FlexPendant display. (For definition of TAF, see Terminology or for more information on TAF, see Understanding the FlexPendant application life cycle.) |
To add another view to the FlexPendant project, you do not need to start a new project. The following procedure explains how to proceed:
Step | Action | ||
|---|---|---|---|
1 | Right-click the project node in the Solution Explorer, point to Add and select New Item. | ||
2 | Select one of the FlexPendant container controls available in the dialog box. Normally it will be a Form .
|
This way all of your views make up a single dll, which is convenient. Most of the time there is no point in dividing the application into several dlls.
Launching the viewThe code for launching the secondary view is simple. It may look like this:
//declare the secondary view as a private member
private View2 _view2;
//create the view and add subscription to its closed event, then launch view
private void button1_Click(object sender, EventArgs e)
{
this._view2 = new View2();
this._view2.Closed += new EventHandler(view2_Closed);
this._view2.ShowMe(this);
}
//dispose of the view when it has been closed
void view2_Closed(object sender, EventArgs e)
{
this._view2.Closed -= new EventHandler(view2_Closed);
this._view2.Dispose();
this._view2 = null;
}
Make sure that there is a natural way for you to get back to the preceding view. The most intuitive way of doing this is to click a Close button or an OK or Cancel button on the command bar. If the secondary view is a TpsForm, this event handler closes it: void menuItem1_Click(object sender, EventArgs e){ this.CloseMe();} |
If you are using Empty as a secondary container control the code you write to launch it is: this._view2.Show();It must be added to the first view’s control collection before it can be shown, like an ordinary .NET control. |