Textures and Materials
Modifying a texture can radically change the appearance of a geometry used in RobotStudio or in any 3D environment. RobotStudio provides the tools necessary to interact with the Textures that its objects use. This topic shows how to create or import a Texture , assign it to a certain Material and ultimately use than material in one of the desired geometry's face.
The steps contained in this topic are:
Declare a Texture object.
Map a bitmap to the texture.
Define a Material .
Modify the parameters of a Material .
Create a box to map the created textures.
Map the Material objects to the different Face objects of the box.
Note
You can easily try out this example using the RobotStudio Empty Add-in template from Visual Studio.
Solution
Textures are declared as objects of the class Texture . For example, a texture containing the built-in texture for environments can be created in the following manner:
Texture environmentTexture = Texture.DefaultEnvironmentMap;It is very common to map a Bitmap into a texture object. To do so, load the Bitmap file and then map it into the texture object. This snippet creates a 120x120 bitmap, paints half of it red and maps it to a texture object:
Bitmap redWhite = new Bitmap(120, 120); // Make a bitmap
for (int x = 0; x < 120; x++) // Paint the bitmap half red
for (int y = 0; y < 60; y++)
redWhite.SetPixel(x, y, Color.Red);
// Apply that bitmap as a texture
Texture rwTexture = new Texture(redWhite);
A Material possess a texture, among other parameters. A very common way for creating a material is by passing a texture object as an argument to the Material constructor.
Material rwMaterial = new Material(rwTexture);
Material evMaterial = new Material(environmentTexture);
Materials can also be created from a Color argument, as shown in the following snippet.
Material salmonite = new Material(Color.DarkSalmon);A Material contains more parameters that can be modified to give a more detailed and complex appearance to the object that the Material belongs to. The Material constructor can receive several colors that interact with the lightning capabilities of RobotStudio. Here we create a shinny green Material to illustrate this point.
Material shinyLightGreen = new Material(Color.LightGreen,   // ambient
Color.LightGreen,   // diffuse
Color.LightGreen,   // specular
Color.LightGreen,   // emissive
128); // shine
We create a sample Box part to map our materials into it and witness the appearance they give to the object.
Part part = new Part();
Body box = Body.CreateSolidBox(new Matrix4(new Vector3(0, 0, 0)), new Vector3(0.5, 0.5, 0.5));
part.Bodies.Add(box);

Station station = Project.ActiveProject as Station;
station.GraphicComponents.Add(part);
A Face object can be created and assigned to a face of a body as shown in the following snippet:
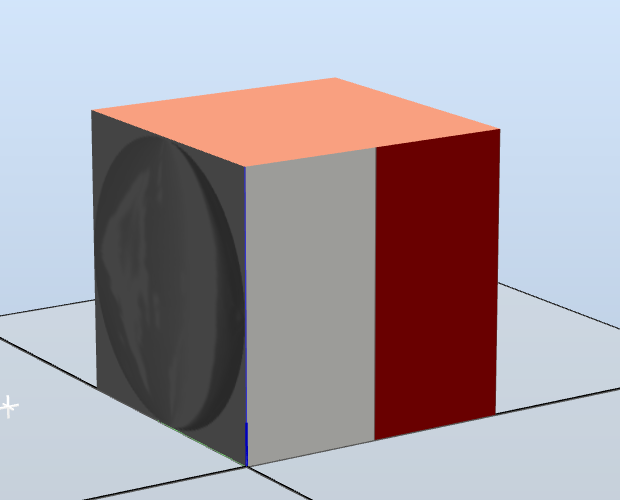
Face topFace = box.Faces[0]; // [0] is the upper face of the box
topFace.SetMaterial(salmonite); //Set the material to DarthSalmon
Faces of a body can also be directly addressed through their index, therefore, we can also change the material of the faces in the following way:
box.Faces[2].SetMaterial(rwMaterial);
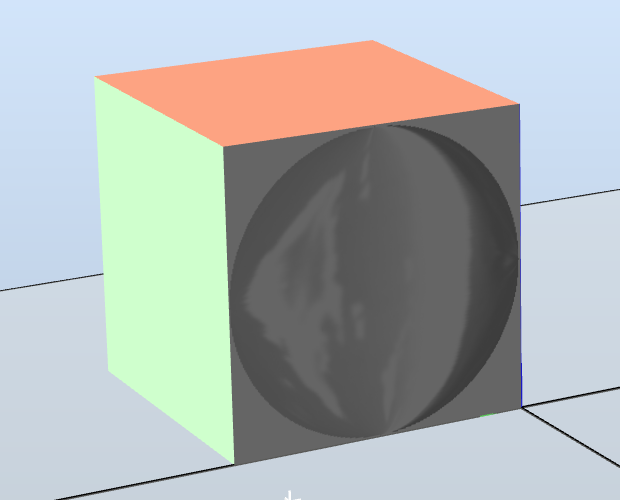
box.Faces[3].SetMaterial(evMaterial);
box.Faces[4].SetMaterial(shinyLightGreen);
The produced outcome is the following geometry:
Example
The complete code example can be copied from here:
private static void TexturesAndMaterials()
{
    // Built-In texture
    Texture environmentTexture = Texture.DefaultEnvironmentMap;


    Bitmap redWhite = new Bitmap(120, 120); // Make a bitmap
    for (int x = 0; x < 120; x++) // Paint the bitmap half red
    for (int y = 0; y < 60; y++)
    redWhite.SetPixel(x, y, Color.Red);
    // Apply that bitmap as a texture
    Texture rwTexture = new Texture(redWhite);

    // Create materials
    Material rwMaterial = new Material(rwTexture);
    Material evMaterial = new Material(environmentTexture);
    Material salmonite  = new Material(Color.DarkSalmon);
    Material shinyLightGreen = new Material(Color.LightGreen,   // ambient
    Color.LightGreen,   // diffuse
    Color.LightGreen,   // specular
    Color.LightGreen,   // emissive
    128); // shine

    Part part = new Part();
    Body box = Body.CreateSolidBox(new Matrix4(new Vector3(0, 0, 0)), new Vector3(0.5, 0.5, 0.5));
    part.Bodies.Add(box);

    Station station = Project.ActiveProject as Station;
    station.GraphicComponents.Add(part);

    Face topFace = box.Faces[0]; // [0] is the upper face of the box
    topFace.SetMaterial(salmonite); //Set the material to DarthSalmon

    // Assign with index
    box.Faces[2].SetMaterial(rwMaterial);
    box.Faces[3].SetMaterial(evMaterial);
    box.Faces[4].SetMaterial(shinyLightGreen);
}
Required Namespaces
ABB.Robotics.RobotStudio.Stations

