Debugging the FlexPendant device |
This section provides information on how to do debug an application executing on the real FlexPendant device.
In general, using the Visual Studio debugger to debug the device works very well and is strongly recommended, but depending on the OS, Visual Studio version and FlexPendant version you are using the requirements for setting up and attaching the Visual Studio debugger will differ somewhat.
Further information and updates concerning this topic will from this release be published on the FlexPendant SDK User Forum (and not in theApplication manual). For more information, see FlexPendant SDK User Forum.
PrerequisitesThe following requirements have to be met:
Service Pack 1 or 2 for .NET Compact Framework 2.0 (.NET CF 2.0 SP2) is required for setting up and using the Visual Studio debugger on the FlexPendant device. It can be downloaded from Microsoft Download Center
To debug with Visual Studio 2008 (as well as Visual Studio 2005 without SP1) you must follow a procedure that will be presented on the FlexPendant SDK User Forum. The procedure will be different for each RobotWare release.
If your PC is running under Windows Vista “Windows Mobile Device Center” needs to be installed in order to connect to the device.
This illustration shows how to connect the FlexPendant, the Robot Controller and your PC in order to debug your application using the Visual Studio debugger.
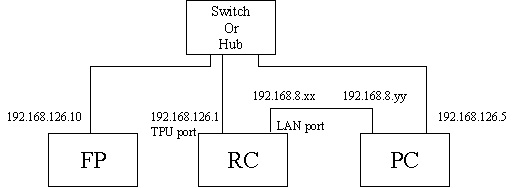
The FlexPendant has a static IP address 192.168.126.10. Your PC IP address must be one on the 126 subnet, that is, 192.168.126.x (not 1 or 255).
Note that this setup is completely independent of the LAN and Service ports. You are plugging the TPU cable from the RC into the switch, a cable from the switch to the RC, and a cable from your PC to the switch.
A connection over the LAN port is optional, but useful, as you may need to use RSO or FTP at the same time. To use both connections, your PC requires two NICs.
Debugging procedureFollow these steps to set up and attach the Visual Studio 2005 SP1debugger to the FlexPendant device:
Step | Action | ||
|---|---|---|---|
1 | On the Tools menu in Visual Studio 2005 click Options . | ||
2 | In the Options dialog expand the Device Tools node and select Devices. Select Window CE 5.0 Device as shown in the following screenshot. 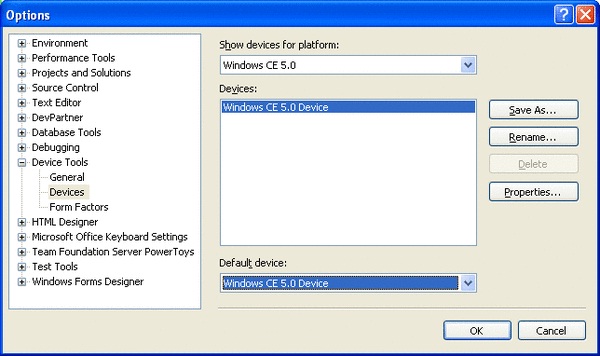
| ||
3 | When the right device has been selected click Properties and then Configure. | ||
4 | Apply the settings shown in the picture. 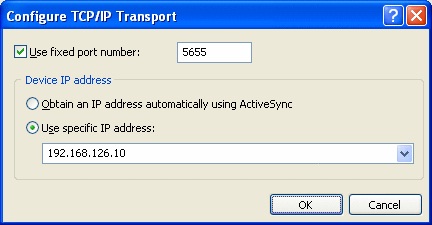 | ||
5 | On the Debug/Tools menu in Visual Studio click Attach To Process. In the Smart Device dialog select for Transport and click the Browse button to specify platform and device. Then click Connect. 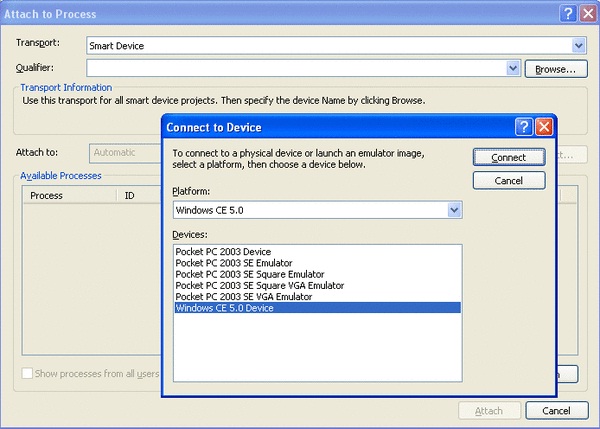 | ||
6 | In the Available list select taf.exe Click Attach. | ||
7 | Set a break point in your source code. | ||
8 | On the FlexPendant, click a button of your application or something else that will make program execution hit the breakpoint. |
If your PC is NOT using XP with Visual Studio 2005 SP1 you need to find information on how to attach the Visual Studio debugger for your specific environment on the FlexPendant SDK User Forum. |
The User Forum of ABB’s RobotStudio Community has a section dedicated to FlexPendant SDK. Here beginners as well as experts discuss code and solutions online. This is also where you find FlexPendant SDK releases for free download and any information that the development or support team want to share with you. For more information, see RobotStudio Community.