Using the project template in Visual Studio |
It is very simple to set up a new FlexPendant project using the integrated project template. It will automatically add the most common SDK references to the project and auto-generate some source code for the main application window, in the selected programming language, either C# or Visual Basic.
To add another view to the FlexPendant project, you do not need to start a new project. For more information, see Container style. |
Follow these steps to create a FlexPendant project:
Step | Action | ||
|---|---|---|---|
1 | On the File menu in Visual Studio, point to New and then click Project. | ||
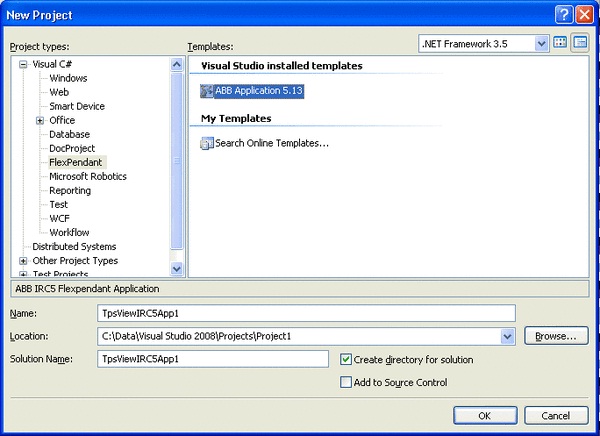
2 | In Visual Studio 2005, in the New Project dialog select Visual C# / Smart Device / FlexPendant or Visual C# / Smart Device / FlexPendant . In Visual Studio 2008, select Visual C# / FlexPendant or Other Languages/Visual Basic/FlexPendant. 
| ||
3 | Enter the name of the application in the Name field and where you want it to be stored in the Location field. Click OK .
| ||
4 | The FlexPendant SDK Project Wizard is now launched. For information about how to configure the application using this wizard see FlexPendant TpsView attribute and Container style. When you are ready click OK. | ||
5 | You need to set up the design support for the FlexPendant GUI controls before starting programming. How this is done is detailed in Setting up design support for FlexPendant controls.
|
The SDK references needed by the FlexPendant project are added automatically when the Project wizard is completed. However, there is a possibility that Visual Studio cannot provide the path to these dlls. If this is the case you should add the references path manually. Follow these steps:
Step | Action | ||
|---|---|---|---|
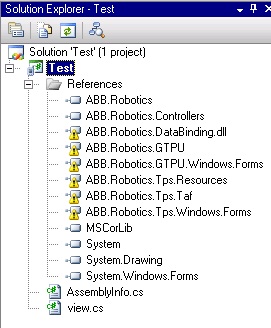
1 | Look at the Solution Explorer of Visual Studio. If you have a C# project expand the References node. Warning triangles mean that the path to the referenced dlls is missing.  For a VB project the Solution Explorer looks the same, except that there is no References node. | ||
2 | C#: Select the project icon, right-click and select Properties. Click the References Paths tab and add the path to the SDK assemblies. VB: Select the project icon, right-click and select Properties. Click the References tab. If the path to the SDK references is missing add it by browsing to the directory where they are located.
| ||
3 | Save the project. You will notice that any warning triangles in the Solution Explorer References node will disappear. |