Deployment of FlexPendant application to a robot system |
When you compile a FlexPendant SDK application an additional assembly named *gtpu.dll is automatically created. This is done by a tool, the ABB Compliance Tool, which verifies that the application complies to the FlexPendant requirements. This proxy dll is necessary to run the application on the FlexPendant.
To test the application on a real FlexPendant both assemblies must be downloaded to the SYSTEM or HOME directory of the robot controller. After this the FlexPendant should be restarted. At startup it loads the application assemblies from the controller.
An advantage of deploying the dlls to the HOME directory is that they will be included in a system backup. |
To download your application assemblies to the controller you can use the Online function File Transfer of RobotStudio.
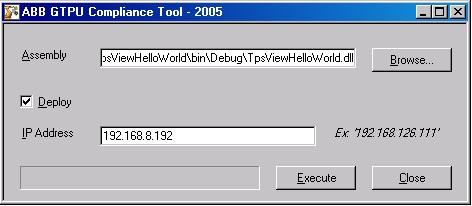
Another way of downloading the application to the robot controller is using the ABB Compliance Tool.
Step | Action | ||
|---|---|---|---|
1 | Verify that the following requirements are met before starting the procedure:
| ||
2 | Open Windows Explorer. | ||
3 | Start abbct.exe at installation directory.
| ||
4 | Click Browse and locate your Visual Studio project and the application assembly in the \bin\debug (or \bin\release) sub-folder. | ||
5 | Check the Deploy box, enter the IP Address of the robot controller and click Execute. Deployment is done to the current system of the controller.If the application consists of several assemblies you need to repeat the procedure for all of these.
| ||
6 | Restart the FlexPendant. For more information about different ways to do this, see Restart the FlexPendant. |
The ABB Compliance Tool can be used via the command window instead of the graphical interface. To do so you write:
abbct.exe /deploy="192.168.8.192" <PATH> \TpsViewHelloWorld.dll <PATH>\TpsViewHelloWorld.gtpu.dll
It is also possible to perform build and deployment in one step. To do this the deploy argument should come last:
abbct.exe <PATH>\TpsViewHelloWorld.dll /deploy="192.168.8.192"
Both the application and proxy assembly are deployed to the controller after the build.
FTP deploymentYou can also use an FTP client to transfer files from your PC to the robot controller.
To use FTP you need:
FTP client program
Configured connection to the controller
RobotWare option: FTP and NFS Client
Name and password
Step | Action |
|---|---|
1 | Transfer resources (for example icons) and the application and proxy assemblies to the HOME or SYSTEM directory of the current system of the controller. |
2 | Restart the FlexPendant. See the next section for information on how to do so. |
For deployment to a customer when the application is ready, see Deployment of FlexPendant application to a robot system. |
If you want to restart the FlexPendant device without restarting the controller, choose one of these alternatives:
Alternative | Action | ||
|---|---|---|---|
1 | Write the command fpcmd "-restart" in the controller console window on your PC. | ||
2 | Perform the following sequence while holding the FlexPendant joystick: Move the joystick three times to the right, once to the left and once down. Confirm your wish to reset the FlexPendant in the dialog that will appear. | ||
3 | Unplug and plug the FlexPendant (power on/ power off).
|
Follow these steps to deploy an application to the Virtual FlexPendant:
Step | Action | ||
|---|---|---|---|
1 | Copy application and proxy assemblies and images to the HOME directory of the system you want to use on your PC.
| ||
2 | Restart the virtual FlexPendant. |
| If you have problems running your application, try to put all files (dlls, gif files and so on.) in the vcbin directory of the robotware your system uses. This setup is as close to the real system setup as you can get. |